
Note
- You can delete contact/s on Android to remove unused numbers and free your built-in storage space.
- To delete a single contact, go to the Contacts app > Select a contact name > Pick More > Choose Delete > Tap Delete.
- In this article, you will learn about various methods to remove Google Contacts on Android and an easy way to retrieve them.
Like your life, the contact list on your Android phone needs regular decluttering. This refers to duplicate contacts, inactive numbers, or contacts you don’t need anymore. One of the best solutions to this recurring problem is deleting such contacts from your Android phone.
In this article, you will learn how to remove contacts from your Android phone, including deleting a single contact, multiple contacts, and even WhatsApp contacts. Oh, you will also find steps to delete contacts from Google account on Android. Curious to know? Then, let’s start:
How to delete contacts from the Contacts App on Android
That’s all you need to do to delete contacts in Gmail! The deleted contacts are temporarily dumped into the Trash for 30 days. After that, they are permanently removed from your smartphone.
- Launch the Contacts app. Make sure you are not in the Phone app.
Ensure you are signed into the Google account where your contacts are saved.
- Make sure you are in the Contacts tab.
- Choose any one of the below options and follow the steps given:
- Remove a single contact: Tap the contact number → Select More (three-dot icon) → Hit Delete icon → Confirm with Delete.

- Delete multiple contacts: Tap and hold a contact → Checkmark other contacts → Pick the bin icon → Select Move to Trash in the popup.

- Delete all contacts from Google account: Tap and hold a contact → Hit More → Tap Select all → Choose Delete icon → Tap Move to Trash again.
- Remove a single contact: Tap the contact number → Select More (three-dot icon) → Hit Delete icon → Confirm with Delete.

However, you can wipe off a contact/s from Trash before the threshold limit. The steps to permanently delete your Android phone contacts are as follows:
How to delete contacts permanently from Trash on Android
You can open Trash only when you have enabled the automatic sync for Google Contacts. Plus, it is accessible with proper network connectivity when your phone is online. Now, let’s move to the steps to delete Google Contacts permanently:
- Move to your Contacts app.
- Select Fix & manage → Pick Trash.
- You can choose from the following:
- Individual contact: Choose your preferred contact to delete → Pick Delete forever → Tap Delete forever in the popup.
- Multiple contacts: Tap and hold a contact → Checkmark multiple contacts → Move to the Menu icon → Select Delete Forever → Hit Delete Forever to confirm.
- All contacts: Tap Empty Trash now → Confirm by selecting Delete forever.
- Individual contact: Choose your preferred contact to delete → Pick Delete forever → Tap Delete forever in the popup.


If you have synced your contacts on any other online account, they will be backed there. So, you must delete contact/s from these accounts, too. The process is quite simple. Follow my lead to the next section to understand the steps.
Moreover, you can see the duplicate contacts list in this window. This article covers the steps to merge contacts on Android later.
How to delete duplicate contacts on Android
The Merge and Fix feature of Google Contacts scans your contact list to auto-find duplicate contacts. This includes contacts with similar names, numbers, emails, or other data. You can auto-merge contacts or merge them manually for specific ones. The steps are as follows:
- Launch the Contacts app.
- Move to the Fix and Manage tab at the bottom.
- Select Merge & fix.
- Here, choose Merge duplicates to see all the duplicate contacts.
- Tap Merge to combine two or more contact numbers under a single name.
- Alternatively, tap Merge All to merge all the duplicate contacts simultaneously.

Sometimes, we see certain contacts saved from WhatsApp and wonder why they are even there. For all such moments, I have included a section to remove WhatsApp contacts you don’t use.
How to delete WhatsApp contacts on Android
WhatsApp shows all the contacts saved on your device’s address book using the online message service. Unfortunately, no direct method exists to delete a contact from the WhatsApp contacts list. However, we have a workaround for quickly deleting WhatsApp contacts. Follow the steps here:
- Go to your WhatsApp account.
- Open the contact you want to get rid of on the contact page.
- Tap the three-dot icon → Select View contact.
- Choose the three-dot icon → Pick View in address book.
- Select the three-dot icon → Tap Delete.
- Pick Delete in the popup menu.
That’s it for WhatsApp contacts. Let’s explore some third-party apps that can help you get rid of unwanted contacts on Android in the following section.
Delete contacts on Android using third-party apps
If none of the abovementioned methods interest you, you can try using a third-party app to delete your Google Contacts. Though handy, these external apps have safety concerns.
Sometimes, these apps don’t delete your contacts but hide them in their native storage space without your knowledge. Thus, you must grant permission to a third-party app only after analyzing its ins and outs.
Try choosing apps with a reputable ranking on the Play Store, study online reviews, and revoke access to apps you don’t use.
Given below are some popular contact deletion apps for Android:
Too much deleting? It’s time to reverse the changes and recover what’s lost. Keep reading.
How to retrieve deleted contacts on Android
Have you accidentally deleted an important contact? You can quickly retrieve them. However, you must know that accounts not synced to your Google Account cannot be recovered once deleted from the phone.
So, it’s time to check the steps to retrieve your deleted Google Contacts on Android smartphones:
- Launch the Google Contacts app.
- Choose the Google Account with your deleted contact.
- Tap Fix & manage → Pick Trash.
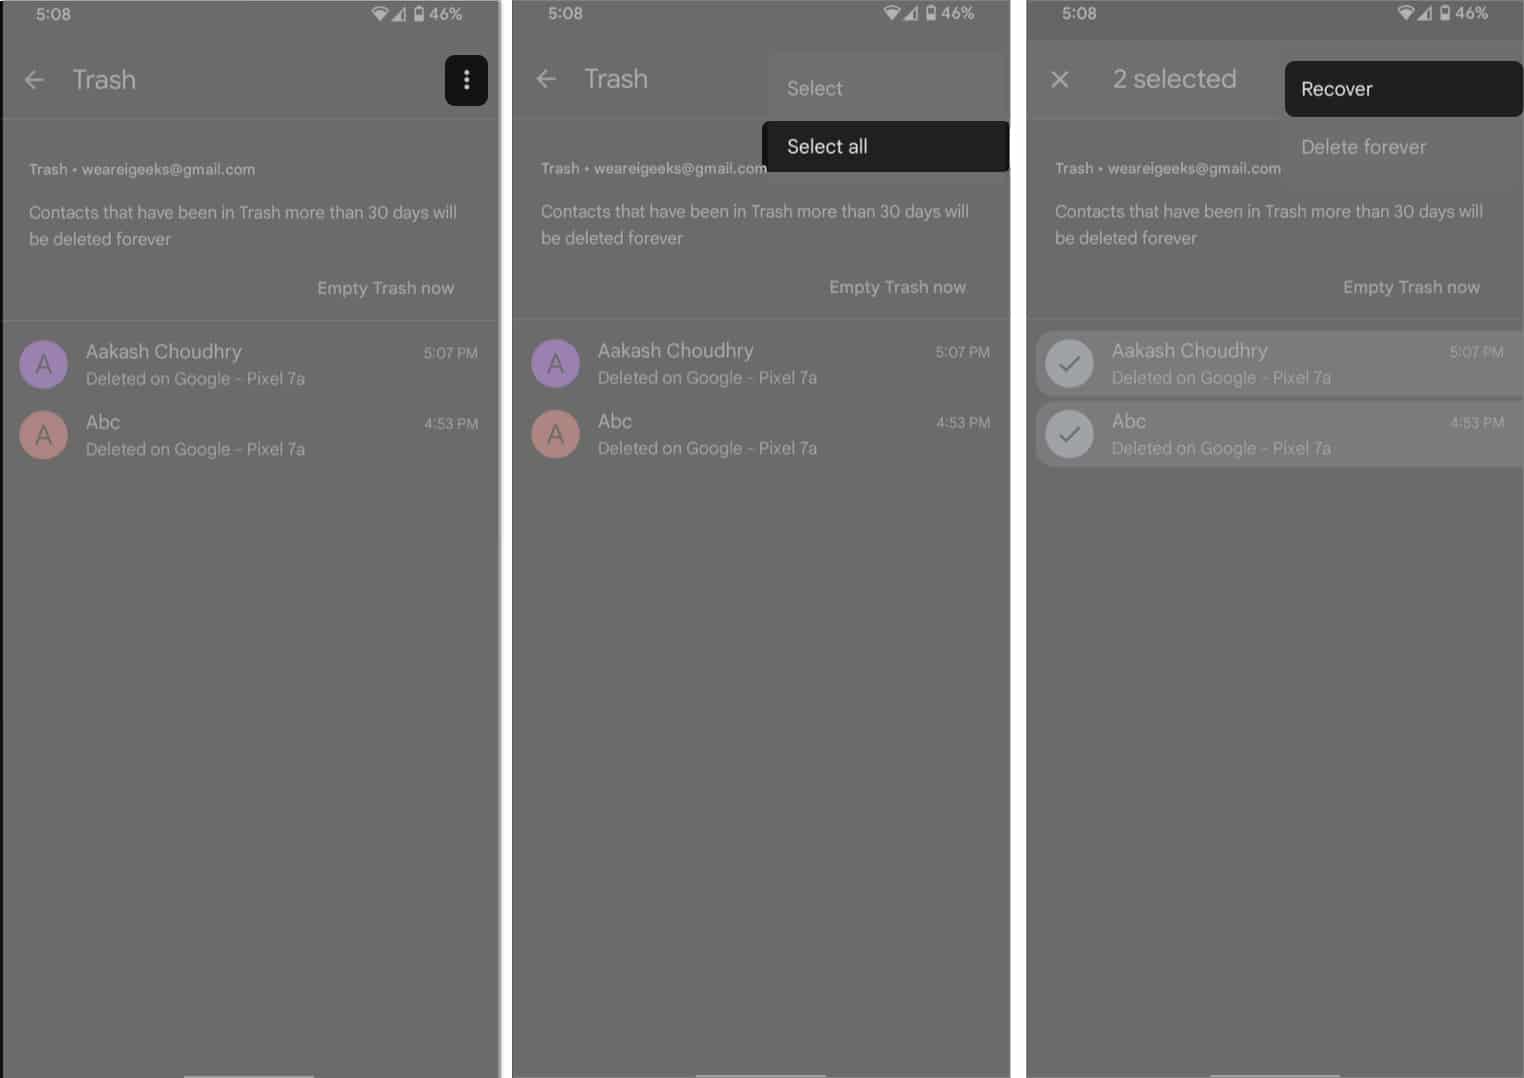
- You can choose any of the following options:
- For a single contact: Tap the contact name → Select Recover.
- Multiple contacts: Tap and hold a contact → Select other contacts → Choose More → Select Recover.
- All contacts: Tap and hold a contact → Pick More → Move to Select all → Choose More → Pick Recover.
- For a single contact: Tap the contact name → Select Recover.


Wrapping up…
Your Android smartphone stores and organizes your contact numbers so you are always connected to your people. However, sometimes, we collect too many unnecessary contacts that eventually consume space on our smartphones.
This is why I created this handy guide to help you delete contacts from your Google account on Android. I hope you can use each method hassle-free on your phone. Do let me know your queries in the comments section.
Author
Readers like you help support iGeekified. When you make a purchase using links on our site, we may earn an affiliate commission. Read Disclaimer.